
There are literally millions of applications in use throughout the world that have been written in Visual Basic, and many of these would make excellent Web applications, either for public use on the Internet/WWW or for internal corporate use on an intranet. When linked with the Microsoft Internet Information Server (IIS) and Web-enabled database systems, these become formidable applications. IIS and its use with Web applications is unfortunately beyond the scope of this book, but in this chapter you will see how to convert the "front-end" VB4 application to run on the Web.
Soon it will be common practice in IT departments across the world to create the majority of applications and business solutions for a Web-type environment. The fact that almost every major software house is revamping its product range to be "Internet-aware" is testament to this.
Much of the translation work involved in transferring a desktop VB application to operate on the Web is actually in the mindset of the programmer. Instead of trying to faithfully reproduce the original application, you can let your creative mind wander a little. You have a new and exciting environment in which to fashion your applications. At each stage, think how you can best use the new features and functionality afforded to you by the Web page. In very much the same way that successful Web designers have realized that, rather than trying to replicate traditional media in a Web page, they should treat the Web as its own medium with its own unique set of opportunities and limitations, you too have the chance to improve on the once desktop-bound user interfaces and functionality of legacy applications.
So if you are faced with translating the company's VB application, where do you start? There are several issues that can be treated separately:
The form will be replaced by either an HTML Web page or preferably an ActiveX Layout. The design and functionality of an ActiveX Layout is very similar to that of a VB form, allowing easy and accurate placement of controls.
Almost any Visual Basic form can be faithfully reproduced as a Web page using the HTML Layout Control, and you have the additional functionality that a Web page can offer, such as hyperlinking and easy multimedia extensions.
The vast majority of standard controls such as text boxes, combo boxes, and labels can quickly and easily be replaced with an equivalent ActiveX control. Some of the more exotic controls might be available as ActiveX controls, and many more are currently being produced. Table 22.1 gives you a guide to what can and can't be replaced, and the following explanations are used in the second column of the table:
Part of MSIE 3.0: An equivalent ActiveX control should be available to users who have installed the full version of MSIE 3.0. However, some properties, methods, and events might differ slightly from the VB4 equivalent. Many of these controls are part of the Windows 95 install.
Not available: An equivalent ActiveX control is not available at the time of this writing. However, you should check the ActiveX Gallery regularly. It might be possible to use the VB4 OCX control. (See Chapter 21, "Advanced ActiveX Techniques.")
Cannot be used: For reasons of security, it is not possible to use this control in a Web page. This includes controls that deal with file I/O and disk housekeeping.
| Visual Basic Control | ActiveX Equivalent |
| Picture Box | see Image Control |
| Label | Part of MSIE 3.0 |
| Text Box | Part of MSIE 3.0 |
| Frame | Not available |
| Command Button | Part of MSIE 3.0 |
| Check Box | Part of MSIE 3.0 |
| Option/Radio Button | Part of MSIE 3.0 |
| Combo Box | Part of MSIE 3.0 |
| List Box | Part of MSIE 3.0 |
| Horizontal Scrollbar | Part of MSIE 3.0 |
| Vertical Scrollbar | Part of MSIE 3.0 |
| Timer | Download from ActiveX Gallery |
| File List Box | Cannot be used |
| Directory List Box | Cannot be used |
| Drive List Box | Cannot be used |
| Shape | Not available |
| Line | Not available |
| Image | Part of MSIE 3.0 |
| Data Control | Cannot be used |
| OLE | Cannot be used |
| Common Dialog | Not available |
| Tab Strip | Part of MSIE 3.0 |
| Rich Text Box | Cannot be used |
| Toolbar | Not available |
| Status Bar | Not available |
| Progress Bar | Not available |
| Tree View | Not available |
| Image List | Not available |
| List View | Not available |
| Slider | Not available |
| Grid | Not available |
| Graph | Not available |
Several conversion utilities have started to appear on the market to turn VB applications into Web/VBScript applications, and the resultant files can save you an awful lot of manual recoding. However, they are not a 100-percent translation, and some only convert the form controls into HTML Intrinsic Controls-all of which means that, at some point, you need to roll up your sleeves and do some manual translation work.
There's a very simple rule when it comes to translating a VB program
to VBScript. If it deals directly with the computer in terms of
disk or file I/O, printer, or monitor, you can't do it. A few
other VB functions have been left out of VBScript to save space-for
example, Format is missing. But, in general, the basic
programming functionality has been left intact. Table 22.2 gives
you a list of all the language and runtime features that are not
available in VBScript at the time of this writing.
| Category | Feature |
| Array Handling | Array function Option Base Private, Public Declaring arrays with lower bound <> 0 |
| Collection | Add, Count, Item, Remove Access to collections using ! character |
| Conditional Compilation | #Const #If...Then...#Else |
| Constants/Literals | Const All intrinsic constants Type-declaration characters (such as 256&) |
| Control Flow | DoEvents For Each...Next GoSub...Return, GoTo On Error GoTo On...GoSub, On...GoTo Line numbers, line labels With...End With |
| Conversion | ccur, CVar, CVDate Format Str, Val Type...End Type |
| Date/Time | Date statement, Time statement Timer |
| DDE | LinkExecute, LinkPoke, LinkRequest, LinkSend |
| Debugging | Debug.Print End, Stop |
| Declaration | Declare (for declaring DLLs) Property Get, Property Let, Property Set Public, Private, Static ParamArray, Optional New |
| Error Handling | Erl Error On Error...Resume Resume, Resume Next |
| File Input/Output | All |
| Financial | All financial functions |
| Object Manipulation | CreateObject GetObject TypeOf |
| Objects | Clipboard, Collection |
| Operators | Like |
| Options | Def type Option Base Option Compare Option Private Module |
| Strings | Fixed-length strings LSet, RSet Mid statement StrConv |
| Using Objects | TypeName Collection access using ! |
The conversion of the application's back end is somewhat more complex because it depends on what software or system you are currently using to feed data to the application. The breadth of current back-end database systems to which Visual Basic can be linked makes it impossible to try to cover the subject in this book.
The following application shows you how to convert a program written in Visual Basic to run as a Web application or Web page. The application is a very simple one that has been put together to demonstrate the differences and similarities between the two environments. First, you see the Visual Basic Windows 95 version, and then you create the HTML Layout Control version.
The application is for an imaginary auto insurance broker. To use the application, you select several criteria and then press the Quote Now button to receive a quotation.
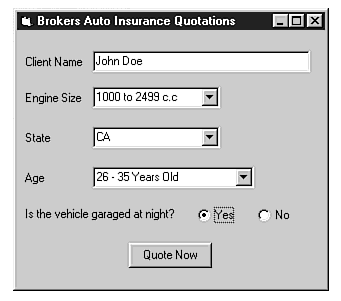
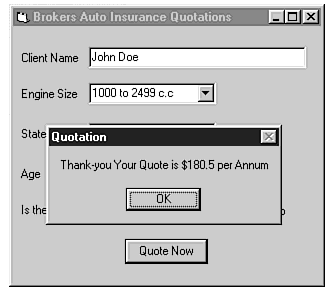
First of all, take a look at the Visual Basic application. Figure 22.1 shows the application running within Windows 95. After you have entered the client's details, click the Quote Now button and the program calculates the insurance premium, as shown in Figure 22.2.
Figure 22.1 : The application running in Windows 95.
Figure 22.2 : Click the button to calculate the quotation.
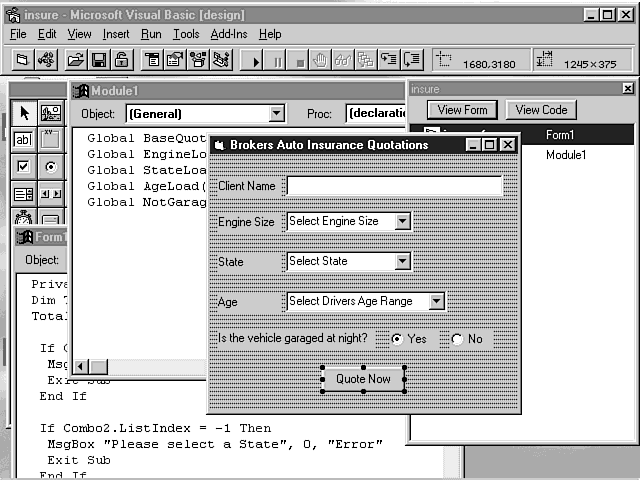
The Visual Basic application is made up of three files:
When the project is compiled, the runtime file insure.exe is created. Figure 22.3 shows what the project looks like in the Visual Basic 4 development environment. Listing 22.1 shows the source code for the form module (insure.frm), and Listing 22.2 shows the source code for the code module (insure.bas).
Figure 22.3 : The insure.vbp file in the Visual Basic development environment.
Listing 22.1. The insure.frm code.
VERSION 4.00
Begin VB.Form Form1
      Caption = "Brokers Auto Insurance Quotations"
      ClientHeight = 3840
      ClientLeft = 2865
      ClientTop = 1995
      ClientWidth = 4620
      Height = 4245
      Left = 2805
      LinkTopic = "Form1"
      ScaleHeight = 3840
      ScaleWidth = 4620
      Top = 1650
      Width = 4740
      Begin VB.ComboBox Combo3
               Height = 315
               Left = 1140
               TabIndex = 8
               Text = "Select Drivers Age Range"
               Top = 2040
               Width = 2415
      End
      Begin VB.ComboBox Combo2
               Height = 315
               Left = 1140
               TabIndex = 7
               Text = "Select State"
               Top = 1440
               Width = 1905
      End
      Begin VB.OptionButton NotIsGaraged
               Caption = "No"
               Height = 255
               Left = 3600
               TabIndex = 4
               Top = 2640
               Width = 645
      End
      Begin VB.OptionButton IsGaraged
               Caption = "Yes"
               Height = 255
               Left = 2700
               TabIndex = 3
               Top = 2640
               Value = -1     'True
               Width = 735
      End
      Begin VB.ComboBox Combo1
               Height = 315
               Left = 1140
               TabIndex = 2
               Text = "Select Engine Size"
               Top = 840
               Width = 1905
      End
      Begin VB.CommandButton Command1
               Caption = "Quote Now"
               Height = 375
               Left = 1680
               TabIndex = 1
               Top = 3180
               Width = 1245
      End
      Begin VB.TextBox Text1
               Height = 315
               Left = 1140
               TabIndex = 0
               Top = 300
               Width = 3255
      End
      Begin VB.Label Label5
               Caption = "Is the vehicle garaged at night?"
               Height = 255
               Left = 120
               TabIndex = 11
               Top = 2640
               Width  = 2355
      End
      Begin VB.Label Label4
               Caption = "Age"
               Height = 255
               Left = 120
               TabIndex =10
               Top = 2100
               Width = 945
      End
      Begin VB.Label Label2
               Caption = "Engine Size"
               Height = 255
               Left = 120
               TabIndex = 9
               Top = 900
               Width = 945
      End
      Begin VB.Label Label3
               Caption = "State"
               Height = 255
               Left = 120
               TabIndex = 6
               Top = 1500
               Width = 945
      End
      Begin VB.Label Label1
               Caption = "Client Name"
               Height = 255
               Left = 120
               TabIndex = 5
               Top = 360
               Width = 945
      End
End
Attribute VB_Name = "Form1"
Attribute VB_Creatable = False
Attribute VB_Exposed = False
Private Sub Command1_Click()
Dim TotalQuote As Double
TotalQuote = 0
 If Combo1.ListIndex = -1 Then
     MsgBox "Please select an Engine Size", 0, "Error"
     Exit Sub
 End If

 If Combo2.ListIndex = -1 Then
     MsgBox "Please select a State", 0, "Error"
     Exit Sub
 End If

 If Combo3.ListIndex = -1 Then
     MsgBox "Please select an Age Range", 0, "Error"
     Exit Sub
 End If

TotalQuote = BaseQuote
TotalQuote = TotalQuote + EngineLoad(Combo1.ListIndex)
TotalQuote = TotalQuote + StateLoad(Combo2.ListIndex)
TotalQuote = TotalQuote + AgeLoad(Combo3.ListIndex)
If NotIsGaraged.Value = True Then
 TotalQuote = TotalQuote + NotGaraged
End If
MsgBox "Thank-you Your Quote is $" & CStr(TotalQuote) & " per Annum",
 0, "Quotation"

End Sub
Private Sub Form_Load()
 Combo1.AddItem "< 1000 c.c"
 Combo1.AddItem "1000 to 2499 c.c"
 Combo1.AddItem "2500 to 2999 c.c"
 Combo1.AddItem "3000 + c.c"

 Combo2.AddItem "AL"
 Combo2.AddItem "CA"
 Combo2.AddItem "IL"
 Combo2.AddItem "MI"
 Combo2.AddItem "NY"
 Combo2.AddItem "TX"

 Combo3.AddItem "Under 20"
 Combo3.AddItem "21 - 25 Years Old"
 Combo3.AddItem "26 - 35 Years Old"
 Combo3.AddItem "Over 36"

 BaseQuote = 110.5

 EngineLoad(0) = 20
 EngineLoad(1) = 30
 EngineLoad(2) = 40
 EngineLoad(3) = 50

 StateLoad(0) = 0
 StateLoad(1) = 10
 StateLoad(2) = 20
 StateLoad(3) = 0
 StateLoad(4) = 20
 StateLoad(5) = 10

 AgeLoad(0) = 50
 AgeLoad(1) = 40
 AgeLoad(2) = 30
 AgeLoad(3) = 20

 NotGaraged = 30


End Sub
Listing 22.2. The insure.bas code.
Attribute VB_Name = "Module1"
Global BaseQuote As Double
Global EngineLoad(4) As Double
Global StateLoad(5) As Double
Global AgeLoad(4) As Double
Global NotGaraged As Double
All three files that make up the insure.vbp Visual Basic project are on the CD-ROM, as is insure.exe. If you have Visual Basic 4 on your computer, you can open the project to take a closer look within the development environment.
So now you know what it is you're trying to do: to convert a simple,
stand-alone Visual Basic application to run as a Web page. The
interface can remain almost the same as the original application.
All the controls used in the Visual Basic application can be directly
translated to the standard ActiveX controls available in the ActiveX
Con-
trol Pad.
Because this is a Web page creation, you will make a couple of minor additions to the interface. First, you can add a colorful graphic of (what else?) a car. You also add two hyperlinks, which in the real world would be extremely useful in this application. The first link is to the policy conditions, and the next link is to the brokerage's payment terms. Obviously, because this is an exercise, neither of the two links go anywhere.
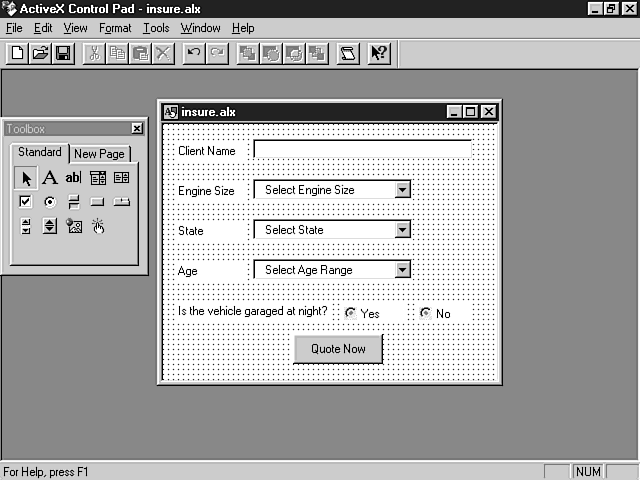
You will use the HTML Layout Control to create the form section of the application. The form layout will reside in the left side of an HTML page. The right side of the page will contain the graphic and the hyperlinks. A table will be used to divide the page. You can start by designing the form:
Now you are ready to add the code to populate the combo boxes and arrays as the layout loads:
ComboBox1.AddItem "< 1000 c.c"
ComboBox1.AddItem "1000 to 2499 c.c"
ComboBox1.AddItem "2500 to 2999 c.c"
ComboBox1.AddItem "3000 + c.c"

ComboBox2.AddItem "AL"
ComboBox2.AddItem "CA"
ComboBox2.AddItem "IL"
ComboBox2.AddItem "MI"
ComboBox2.AddItem "NY"
ComboBox2.AddItem "TX"

ComboBox3.AddItem "Under 20"
ComboBox3.AddItem "21 - 25 Years Old"
ComboBox3.AddItem "26 - 35 Years Old"
ComboBox3.AddItem "Over 36"

BaseQuote = 110.5

EngineLoad(0) = 20
EngineLoad(1) = 30
EngineLoad(2) = 40
EngineLoad(3) = 50

StateLoad(0) = 0
StateLoad(1) = 10
StateLoad(2) = 20
StateLoad(3) = 0
StateLoad(4) = 20
StateLoad(5) = 10

AgeLoad(0) = 50
AgeLoad(1) = 40
AgeLoad(2) = 30
AgeLoad(3) = 20

NotGaraged = 30
Dim TotalQuote
TotalQuote = 0
 If ComboBox1.ListIndex = -1 Then
     Alert "Please select an Engine Size"
     Exit Sub
 End If

 If ComboBox2.ListIndex = -1 Then
     Alert "Please select a State"
     Exit Sub
 End If

 If ComboBox3.ListIndex = -1 Then
     Alert "Please select an Age Range"
     Exit Sub
 End If

TotalQuote = BaseQuote
TotalQuote = TotalQuote + EngineLoad(ComboBox1.ListIndex)
TotalQuote = TotalQuote + StateLoad(ComboBox2.ListIndex)
TotalQuote = TotalQuote + AgeLoad(ComboBox3.ListIndex)
If OptionButton2.Value = True Then
 TotalQuote = TotalQuote + NotGaraged
End If
MsgBox "Thank-you Your Quote is $" & CStr(TotalQuote) & " per Annum", 0,
"Quotation"
<HTML>
<HEAD>
<TITLE>Brokers Auto Insurance Quotation</TITLE>
</HEAD>
<BODY BGCOLOR="white">
<TABLE>
<TR><TD>
</TD>
<TD ALIGN="CENTER">
<FONT FACE="arial">
<H2>Brokers Auto <BR>Insurance Quotation</H2>
<P>
<IMG SRC="car.gif">
<P>
<A HREF="">View Policy Conditions</A><BR>
<A HREF="">View Payment Terms Guide</A>
</TD></TR>
</TABLE>
</BODY>
</HTML>
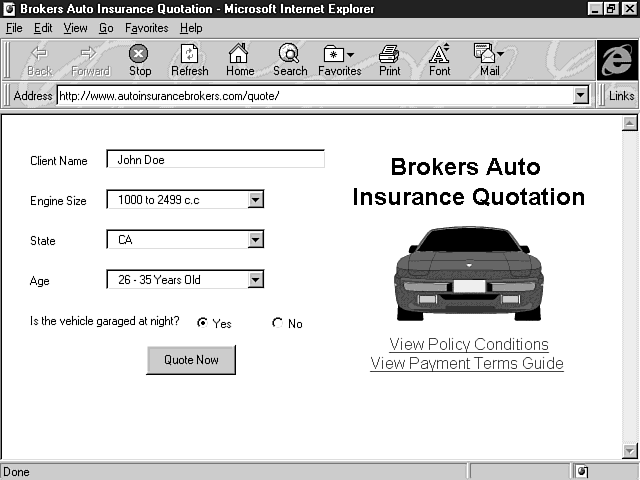
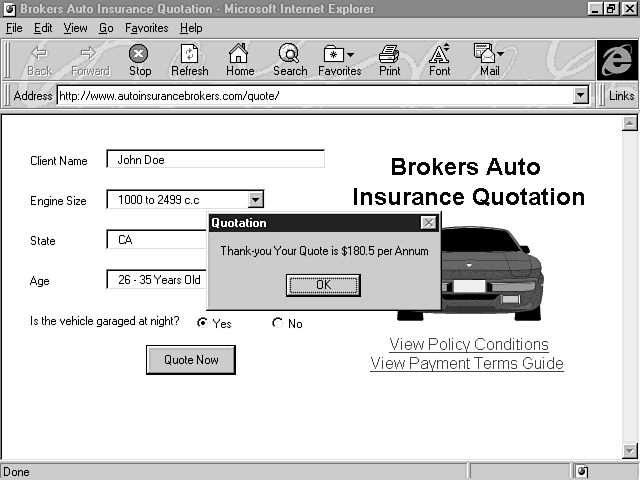
Finally, run insure.htm through the browser to test. The functionality of the form is the same as for the Visual Basic application, with some added features, as you can see in Figure 22.8. As with the Visual Basic application, a simple message box is used to display the quotation when you press the button, as shown in Figure 22.9.
Figure 22.8 : The insure.htm file in the browser.
Figure 22.9 : Fill in the form and click the button to obtain a quote.
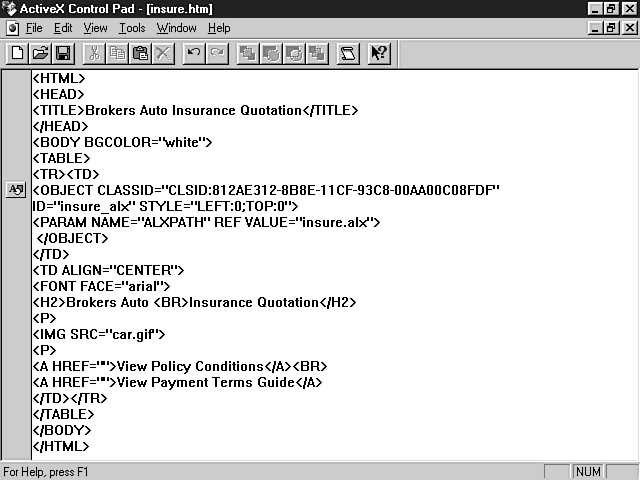
The complete listing for the source code in insure.alx is shown in Listing 22.3. Listing 22.4 shows the source code for insure.htm.
Listing 22.3. The insure.alx code.
<SCRIPT LANGUAGE="VBScript">
<!--
dim BaseQuote
dim EngineLoad(4)
dim StateLoad(5)
dim AgeLoad(4)
dim NotGaraged
-->
</SCRIPT>
<SCRIPT LANGUAGE="VBScript">
<!--
Sub CommandButton1_Click()
Dim TotalQuote
TotalQuote = 0
 If ComboBox1.ListIndex = -1 Then
     Alert "Please select an Engine Size"
     Exit Sub
 End If

 If ComboBox2.ListIndex = -1 Then
     Alert "Please select a State"
     Exit Sub
 End If

 If ComboBox3.ListIndex = -1 Then
     Alert "Please select an Age Range"
     Exit Sub
 End If

TotalQuote = BaseQuote
TotalQuote = TotalQuote + EngineLoad(ComboBox1.ListIndex)
TotalQuote = TotalQuote + StateLoad(ComboBox2.ListIndex)
TotalQuote = TotalQuote + AgeLoad(ComboBox3.ListIndex)
If OptionButton2.Value = True Then
 TotalQuote = TotalQuote + NotGaraged
End If
MsgBox "Thank-you Your Quote is $" & CStr(TotalQuote) & " per Annum",
 0, "Quotation"

end sub
-->
</SCRIPT>
<SCRIPT LANGUAGE="VBScript">
<!--
Sub Layout1_OnLoad()
 ComboBox1.AddItem "< 1000 c.c"
 ComboBox1.AddItem "1000 to 2499 c.c"
 ComboBox1.AddItem "2500 to 2999 c.c"
 ComboBox1.AddItem "3000 + c.c"

 ComboBox2.AddItem "AL"
 ComboBox2.AddItem "CA"
 ComboBox2.AddItem "IL"
 ComboBox2.AddItem "MI"
 ComboBox2.AddItem "NY"
 ComboBox2.AddItem "TX"

 ComboBox3.AddItem "Under 20"
 ComboBox3.AddItem "21 - 25 Years Old"
 ComboBox3.AddItem "26 - 35 Years Old"
 ComboBox3.AddItem "Over 36"

 BaseQuote = 110.5

 EngineLoad(0) = 20
 EngineLoad(1) = 30
 EngineLoad(2) = 40
 EngineLoad(3) = 50

 StateLoad(0) = 0
 StateLoad(1) = 10
 StateLoad(2) = 20
 StateLoad(3) = 0
 StateLoad(4) = 20
 StateLoad(5) = 10

 AgeLoad(0) = 50
 AgeLoad(1) = 40
 AgeLoad(2) = 30
 AgeLoad(3) = 20

 NotGaraged = 30
end sub
-->
</SCRIPT>
<DIV BACKGROUND="#ffffff" ID="Layout1" STYLE="LAYOUT:FIXED;WIDTH:250pt;
HEIGHT:192pt;">
          <OBJECT ID="TextBox1"
           CLASSID="CLSID:8BD21D10-EC42-11CE-9E0D-00AA006002f3"
STYLE="TOP:11pt;LEFT:68pt;WIDTH:165pt;HEIGHT:15pt;TABINDEX:0;ZINDEX:0;">
                    <PARAM NAME="VariousPropertyBits" VALUE="746604571">
                    <PARAM NAME="Size" VALUE="5821;529">
                    <PARAM NAME="FontCharSet" VALUE="0">
                    <PARAM NAME="FontPitchAndFamily" VALUE="2">
                    <PARAM NAME="FontWeight" VALUE="0">
          </OBJECT>
          <OBJECT ID="ComboBox1"
           CLASSID="CLSID:8BD21D30-EC42-11CE-9E0D-00AA006002f3"
STYLE="TOP:41pt;LEFT:68pt;WIDTH:120pt;HEIGHT:16pt;TABINDEX:1;ZINDEX:1;">
                    <PARAM NAME="VariousPropertyBits" VALUE="746604571">
                    <PARAM NAME="DisplayStyle" VALUE="3">
                    <PARAM NAME="Size" VALUE="4234;556">
                    <PARAM NAME="MatchEntry" VALUE="1">
                    <PARAM NAME="ShowDropButtonWhen" VALUE="2">
                    <PARAM NAME="Value" VALUE="Select Engine Size">
                    <PARAM NAME="FontCharSet" VALUE="0">
                    <PARAM NAME="FontPitchAndFamily" VALUE="2">
                    <PARAM NAME="FontWeight" VALUE="0">
          </OBJECT>
          <OBJECT ID="ComboBox2"
           CLASSID="CLSID:8BD21D30-EC42-11CE-9E0D-00AA006002f3"
STYLE="TOP:71pt;LEFT:68pt;WIDTH:120pt;HEIGHT:16pt;TABINDEX:2;ZINDEX:2;">
                    <PARAM NAME="VariousPropertyBits" VALUE="746604571">
                    <PARAM NAME="DisplayStyle" VALUE="3">
                    <PARAM NAME="Size" VALUE="4234;556">
                    <PARAM NAME="MatchEntry" VALUE="1">
                    <PARAM NAME="ShowDropButtonWhen" VALUE="2">
                    <PARAM NAME="Value" VALUE="Select State">
                    <PARAM NAME="FontCharSet" VALUE="0">
                    <PARAM NAME="FontPitchAndFamily" VALUE="2">
                    <PARAM NAME="FontWeight" VALUE="0">
          </OBJECT>
          <OBJECT ID="ComboBox3"
           CLASSID="CLSID:8BD21D30-EC42-11CE-9E0D-00AA006002f3"
STYLE="TOP:101pt;LEFT:68pt;WIDTH:120pt;HEIGHT:16pt;TABINDEX:3;ZINDEX:3;">
                    <PARAM NAME="VariousPropertyBits" VALUE="746604571">
                    <PARAM NAME="DisplayStyle" VALUE="3">
                    <PARAM NAME="Size" VALUE="4234;556">
                    <PARAM NAME="MatchEntry" VALUE="1">
                    <PARAM NAME="ShowDropButtonWhen" VALUE="2">
                    <PARAM NAME="Value" VALUE="Select Age Range">
                    <PARAM NAME="FontCharSet" VALUE="0">
                    <PARAM NAME="FontPitchAndFamily" VALUE="2">
                    <PARAM NAME="FontWeight" VALUE="0">
          </OBJECT>
          <OBJECT ID="OptionButton1"
           CLASSID="CLSID:8BD21D50-EC42-11CE-9E0D-00AA006002f3"
STYLE="TOP:135pt;LEFT:135pt;WIDTH:49pt;HEIGHT:15pt;TABINDEX:4;ZINDEX:4;">
                    <PARAM NAME="BackColor" VALUE="16777215">
                    <PARAM NAME="ForeColor" VALUE="2147483666">
                    <PARAM NAME="DisplayStyle" VALUE="5">
                    <PARAM NAME="Size" VALUE="1720;529">
                    <PARAM NAME="Caption" VALUE="Yes">
                    <PARAM NAME="FontCharSet" VALUE="0">
                    <PARAM NAME="FontPitchAndFamily" VALUE="2">
                    <PARAM NAME="FontWeight" VALUE="0">
          </OBJECT>
          <OBJECT ID="OptionButton2"
           CLASSID="CLSID:8BD21D50-EC42-11CE-9E0D-00AA006002f3"
STYLE="TOP:135pt;LEFT:191pt;WIDTH:41pt;HEIGHT:15pt;TABINDEX:5;ZINDEX:5;">
                    <PARAM NAME="BackColor" VALUE="16777215">
                    <PARAM NAME="ForeColor" VALUE="2147483666">
                    <PARAM NAME="DisplayStyle" VALUE="5">
                    <PARAM NAME="Size" VALUE="1455;529">
                    <PARAM NAME="Caption" VALUE="No">
                    <PARAM NAME="FontCharSet" VALUE="0">
                    <PARAM NAME="FontPitchAndFamily" VALUE="2">
                    <PARAM NAME="FontWeight" VALUE="0">
          </OBJECT>
          <OBJECT ID="Label1"
           CLASSID="CLSID:978C9E23-D4B0-11CE-Bf2D-00AA003f40D0"
STYLE="TOP:15pt;LEFT:11pt;WIDTH:53pt;HEIGHT:15pt;ZINDEX:6;">
                    <PARAM NAME="BackColor" VALUE="16777215">
                    <PARAM NAME="Caption" VALUE="Client Name">
                    <PARAM NAME="Size" VALUE="1853;529">
                    <PARAM NAME="FontCharSet" VALUE="0">
                    <PARAM NAME="FontPitchAndFamily" VALUE="2">
                    <PARAM NAME="FontWeight" VALUE="0">
          </OBJECT>
          <OBJECT ID="Label2"
           CLASSID="CLSID:978C9E23-D4B0-11CE-Bf2D-00AA003f40D0"
STYLE="TOP:45pt;LEFT:11pt;WIDTH:53pt;HEIGHT:15pt;ZINDEX:7;">
                    <PARAM NAME="BackColor" VALUE="16777215">
                    <PARAM NAME="Caption" VALUE="Engine Size">
                    <PARAM NAME="Size" VALUE="1853;529">
                    <PARAM NAME="FontCharSet" VALUE="0">
                    <PARAM NAME="FontPitchAndFamily" VALUE="2">
                    <PARAM NAME="FontWeight" VALUE="0">
          </OBJECT>
          <OBJECT ID="Label3"
           CLASSID="CLSID:978C9E23-D4B0-11CE-Bf2D-00AA003f40D0"
STYLE="TOP:75pt;LEFT:11pt;WIDTH:53pt;HEIGHT:15pt;ZINDEX:8;">
                    <PARAM NAME="BackColor" VALUE="16777215">
                    <PARAM NAME="Caption" VALUE="State">
                    <PARAM NAME="Size" VALUE="1853;529">
                    <PARAM NAME="FontCharSet" VALUE="0">
                    <PARAM NAME="FontPitchAndFamily" VALUE="2">
                    <PARAM NAME="FontWeight" VALUE="0">
          </OBJECT>
          <OBJECT ID="Label4"
           CLASSID="CLSID:978C9E23-D4B0-11CE-Bf2D-00AA003f40D0"
STYLE="TOP:105pt;LEFT:11pt;WIDTH:53pt;HEIGHT:15pt;ZINDEX:9;">
                    <PARAM NAME="BackColor" VALUE="16777215">
                    <PARAM NAME="Caption" VALUE="Age">
                    <PARAM NAME="Size" VALUE="1853;529">
                    <PARAM NAME="FontCharSet" VALUE="0">
                    <PARAM NAME="FontPitchAndFamily" VALUE="2">
                    <PARAM NAME="FontWeight" VALUE="0">
          </OBJECT>
          <OBJECT ID="Label5"
           CLASSID="CLSID:978C9E23-D4B0-11CE-Bf2D-00AA003f40D0"
STYLE="TOP:135pt;LEFT:11pt;WIDTH:116pt;HEIGHT:15pt;ZINDEX:10;">
                    <PARAM NAME="BackColor" VALUE="16777215">
                    <PARAM NAME="Caption" VALUE="Is the vehicle garaged
at night?">
                    <PARAM NAME="Size" VALUE="4101;529">
                    <PARAM NAME="FontCharSet" VALUE="0">
                    <PARAM NAME="FontPitchAndFamily" VALUE="2">
                    <PARAM NAME="FontWeight" VALUE="0">
          </OBJECT>
          <OBJECT ID="CommandButton1"
           CLASSID="CLSID:D7053240-CE69-11CD-A777-00DD01143C57"
STYLE="TOP:158pt;LEFT:98pt;WIDTH:68pt;HEIGHT:23pt;TABINDEX:11;ZINDEX:11;">
                    <PARAM NAME="Caption" VALUE="Quote Now">
                    <PARAM NAME="Size" VALUE="2381;794">
                    <PARAM NAME="FontCharSet" VALUE="0">
                    <PARAM NAME="FontPitchAndFamily" VALUE="2">
                    <PARAM NAME="ParagraphAlign" VALUE="3">
                    <PARAM NAME="FontWeight" VALUE="0">
          </OBJECT>
</DIV>
Listing 22.4. The insure.htm code.
<HTML>
<HEAD>
<TITLE>Brokers Auto Insurance Quotation</TITLE>
</HEAD>
<BODY BGCOLOR="white">
<TABLE>
<TR><TD>
<OBJECT CLASSID="CLSID:812AE312-8B8E-11CF-93C8-00AA00C08FDF"
ID="insure_alx" STYLE="LEFT:0;TOP:0">
<PARAM NAME="ALXPATH" REF VALUE="insure.alx">
 </OBJECT>
</TD>
<TD ALIGN="CENTER">
<FONT FACE="arial">
<H2>Brokers Auto <BR>Insurance Quotation</H2>
<P>
<IMG SRC="car.gif">
<P>
<A HREF="">View Policy Conditions</A><BR>
<A HREF="">View Payment Terms Guide</A>
</TD></TR>
</TABLE>
</BODY>
</HTML>
As you have seen, converting Visual Basic applications can be very straightforward. If you compare insure.alx with insure.frm, you will notice that apart from a few name changes, the coding is almost identical. The Web environment affords many advantages to application developers over the window environment, whether the application is destined for use as a corporate intranet or a publicly available Web page. Soon, the conversion of back-end data sources for Visual Basic applications will be as easy as creating the user interface, because Microsoft and other companies will continue the now unstoppable march toward the multiplatform seamless desktop and Web.
We should count ourselves lucky to be an integral part of the development of the next great information medium-a phase in social history that will prove to be just as important as the invention of the first printing press. I sincerely hope that, in the course of reading this book, your imagination has been stirred and your knowledge of client-side scripting increased sufficiently to allow you to venture further into creating new, dynamic, and interactive Web pages using VBScript. We are all part of the World Wide Web, and its continued success is dependent upon us developing and improving both the content and presentation of the information we have to share. Whether your motivation for using VBScript is to increase traffic to your site, to improve the functionality of your Web pages, or to move toward an intranet, I wish you luck and look forward to seeing the results on my travels around the Net.
Now you've seen how to transfer your VB applications to a Web environment using ActiveX controls and the HTML Layout Control. To learn more about these controls, see the following chapters:
| How do I convert an application that needs to reference data stored on the user's hard drive? | |
| You have to rethink how you are going to access that data, and whether the data must remain on the user's drive. You might find that it is actually more efficient to store the data on the server and
access it as needed. If you are in a situation where user-specific information is held on the user's machine, you might again be faced with rethinking the database design. For example, you can have the user log onto a page with a unique ID, which you then use to retrieve the user's specific data from a general users database on the server. There is no safe method at present-other than the limited text data stored within a cookie file-by which you can read and write data to a user's hard drive. |


